


This is a reader-supported site. When you buy through links on this site, I may earn an affiliate commission. Thanks for your support! 🙂

I’ve been experimenting with two new recipes for weatherproof paper mache clay.
Note: We had a vote, and we’re now calling this new recipe “Paper Cement Clay.” Scroll down below the article to see updates on this post, and to see sculptures that have been made with the recipes. 🙂
I should have done these experiments way back in 2013, because that’s when Warren Eggleton wrote a guest post for this website. He showed us how he made his giant pots using a version of our paper mache clay recipe, with the addition of Portland cement.
The last time we heard from him, his pots had been outside for six years, in Australia.


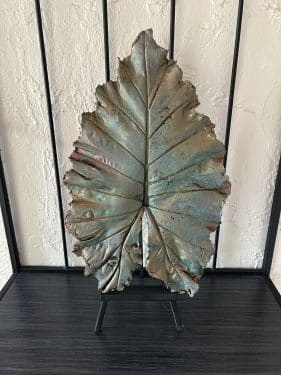
- I recently made a casting of a leaf with this mixture.
- And I sculpted a garden toad to go on the leaf. The new sculptures will be left in my garden over the winter, to see how well they hold up
- And there is now an update video, after the garden toad spent most of a Minnesota winter outside. So far, he seems to be doing OK, but it may depend on the climate and the product used to seal it. Be sure to do your own experiments.
I made some changes to Warren’s version of weatherproof paper mache, just to make sure every batch comes out exactly the same.
I also created two different recipes. One of them contains all the usual ingredients for paper mache clay, but the flour is replaced with Portland cement.
The second recipe leaves out the drywall joint compound, because it’s hard for some people to find.
I tested both of my new recipes by spreading small samples onto cardboard every 30 minutes, to see how long we could continue to use them before they stiffened up too much.
The mixtures will eventually get hard in the bowl because of the Portland cement, but I was able to continue using them for at least 3 hours, with the room temperature at 76° F (24.4 C).
Warren told us in his post that it will get stiff faster in warmer weather.


Test pieces for weatherproof paper mache clay recipe with drywall joint compound.

Test pieces for weatherproof paper mache clay recipe without drywall joint compound.
How the two recipes are different after they dry:


The texture of the recipe that includes the drywall joint compound is smoother – you can see that in the test piece on the right in the image above. However, for an outdoor sculpture, the difference may be so small that it really doesn’t matter.
Try the recipe that you think you’d prefer, and put your sculpture out in the garden.
After it’s been out there for a few months or a year, please come back and let us know if the rain, snow or sun has caused any noticeable damage.
Weatherproof paper mache clay recipe with drywall joint compound:
Note – be sure to watch the video at the top of the page to see how the ingredients were measured and mixed. If you want to make a larger batch, you may want to mix it with a paint mixer attachment on an electric drill.
Mix together:
- 1/2 cup drywall joint compound (200 grams)
- 1/2 cup Elmer’s Glue-All PVA glue (130 grams) Note – will not work with DAP or Würth brand joint compound.
- 1/2 cup damp toilet paper or recycled paper*
Mix until there are no lumps of paper in the mixture. Then add and mix well:
- 1 cup Portland cement.
*To see how to weigh the damp paper, watch the video on this page, starting at the 3:06 mark. You’ll need to scroll down the page to find the video. If you don’t have a kitchen scale, soak the paper in hot water, then squeeze out most of the water (but not all of it) and use 1/2 cup of the damp paper.
Weatherproof paper mache clay recipe without drywall joint compound:
Mix together:
- 1/2 cup Elmer’s Glue-All (PVA glue)
- 1/2 cup damp toilet paper or recycled paper*
Mix until there are no lumps of paper in the mixture. Then add and mix well:
- 2/3 cup Portland cement.
More experiments needed!
Warren had great luck with his pots outdoors in Australia. But I can’t know if these recipes will work here in Minnesota until I make a sculpture and leave it outside to see how well it does in our crazy weather.
In fact, we all need to consider these experimental recipes until we’ve had a chance to try them ourselves, in our own climate.
If you experiment with one or both of the recipes, please come back after a few months and let us know how they worked! 🙂
Related Posts:


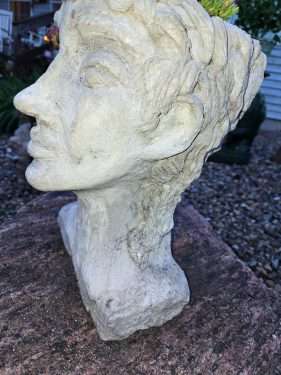
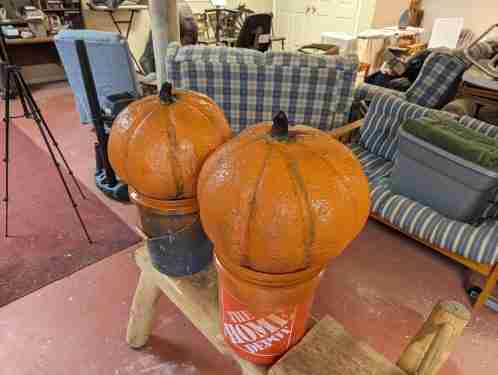
Some of the projects readers have made with this recipe for paper cement clay:










Love your content,, easy to follow!! Just a quick question.. could you use mortar in the place of the Portland cement? I received a lot of bags of mortar for free and wondered if I could use it instead of having to buy the cement? I have used the mortar for various concrete crafts and I like it because it is a fine powder and when mixed it goes on smoothly!! Thank you for all your helpful articles and recipes!!
I’ve never tried it, but that sounds like an interesting experiment. If you try it, please let us know how well it holds up. 🙂
Hello and thank you for your great tips and tricks. I have made a paper mache pumpkin I want to cover with the cement clay but I find the cement clay a little too thick. Can it be “watered” down to a brush on consistency?
Hi Monique. I’ve never tried that, but it might work. Try it on a piece of cardboard first, to make sure it works, before finishing your pumpkin – and be sure to let us know how your experiments turned out. 🙂
I am loking forward to trying this paper cement clay. I am wondering if I can use a quickrete quick setting cement. It seems the smallest bag of Portland cement I can lfind is 37lbs
That is far too much cement and unwieldy to store and move. the quickrete product I can get in a 10lb bucket, so much better to carry and store. the Quick setting fQuitckrete product gets mixed with a polymer so I am wondering if the polymer is what makes it set quick and the cement itself is the same as in the giant bags? any one know any of this ?
Hi Jacqueline. As far as I know, you’ll be the first person to try that product in this recipe. If the bag is reasonably inexpensive, go ahead and give it a try. And pay attention to the setting time – if it really does dry quick, like it says on the label, you might not have time to work with it. But maybe the other ingredients in the recipe will slow it down. If you try it, be sure to let us know if it works! 🙂
I will let you know! It is fairly inexpensive. I did find some smaller packages of a white Portland cement on Amazon so I have that option, but it is more expensive and shipping would add to that.
Hello from Texas! I am excited to try this…but since I am a newbie to all this…was wondering …does this work like a clay? I mean can it be sculpted without anything under it to support it when sculpting? I hope my question makes sense 🙂 And the Portland cement…is that like the Quickcrete? Thank you so much!!
Your question makes sense, but this material must be used in a thin layer over an armature, so it can dry fast enough to prevent mold. I think one of the commercial air dry clay products would be closer to the type of material you’re looking for.
Hi there – I used the original clay recipe with the cement and it worked really well. It is still surviving in the wild fluctuations of the Canadian winter (minus 40 celsius had been the coldest and 35 celsius in the summer where I am). It has survived for over three years and is still fine. My first attempt I got the recipe wrong but after sharing with Jonni I figured it out :). It saves a lot of money to use the recipe instead of using just a sealant in my experience.
Thanks so much for letting us know! I started on a bear more than a year ago, but I’ve been putting it off because so many other projects got in the way. As soon as I get all moved into my new house, I’ll unpack him and finish it. Your comments are really encouraging. 🙂
Could you use mortar instead of Portland cement? Would mortar allow you to omit the PVA glue?
Thanks!
I don’t know if that would work or not. I really don’t know very much about cement – and nothing at all about mortar – so you’d need to try it to find out.
This looks like something that would work great for making faux stones. But it would have to go over a type of large mold (like wire or cardboard box). Will it soak in or can the cardboard be removed after?
I haven’t tried doing that, but there are several YouTube channels that show us how to make fake rocks. This video is about making them over cardboard, and I think he uses regular bags of cement, which would be less expensive than this recipe.
Wondering if anyone has tried this recipe in a mold? I have a cement paver mold that I wanted to test this recipe with, but I don’t know if it will stick to the plastic or not once dry.
Hi Sarah. If you use a release of some kind, it shouldn’t stick. But it’s quite thick, to make it useful for sculpting. A pourable cement product would probably make a better casting, because it will naturally flow into the fine details. The folks at your local DIY store should be able to help you find the right product for your mold.
I might recommend AquaCon for concrete, one of the MANY mold release agents available from the great folks over at Smooth-On –
https://www.smooth-on.com/product-line/aquacon/
Thanks for the tip! 🙂
Is there a reason to use the joint compound if you can make it without- what is the benefit?
I think it’s a little easier to get fine details with the joint compound, but the mix works without it.
I love this recipe, but I’d rather use flour as it’s so much cheaper than white glue for bigger projects. Has anyone tried this recipe with flour instead of PVA glue? Is there any reason that wouldn’t work?
I don’t know if anyone has tried it. We do have a recipe for indoor paper mache clay that uses home-made paste instead of the glue, and I like using it. But it doesn’t dry quite as hard as the one with the glue, and you need to make sure to get it dry as fast as possible because, like any paper mache, it will grow mold if it’s wet for too long. And any cement recipe will dry a lot slower than ordinary paper mache clay. It’s worth a try, though – if you do an experiment, be sure to let us know how it comes out.
Definitely an experiment. If it isn’t the right material for this project, I am just going to have to come up with another reason to try the outdoor recipe. That’s very exciting news for me.
I’m wanting to customize a metal mailbox with this so that it looks like a chicken. Do you think it would bond to the metal directly or would I need to (glue?) the concete clay pieces onto the box when dried?
It won’t stick to metal, but it will also shrink slightly when it’s drying. I’m not sure this will work for your project, but if you create an armature over the mailbox, perhaps with crumpled foil, and then apply a thin layer of it over the foil, that might work. You’ll want to do some small experiments, first, though, to make sure it will do what you need it to do.